
Configuring the time zone and code page with Group Policy enables the administrator to centrally manage these settings for a multitude of systems.
| Change Log 18.01.2019: added the section Redirecting the time zone of the local client in remote sessions. |
| Supported operating systems: Windows 2003/XP and higher, up to and including Windows 10 and Windows Server 2016 (all versions and builds). Supported deployment methods: all, including direct (bare-metal) installations and image-based deployments using technologies such as Citrix Machine Creation Services (MCS) and Citrix Provisioning Services (PVS). |
This section deals with the configuration of the time zone settings. On a local machine, these are configured in the Date & Time settings. Time zone settings are system-specific and not configured per-user (although you can redirect the local time zone in a remote session).

The time zone configuration is stored in the Windows registry in the HKEY_LOCAL_MACHINE hive. The exact registry key is:
HKLM\SYSTEM\CurrentControlSet\Control\TimeZoneInformation
The time zone settings consist of multiple values as seen in the screenshot below.
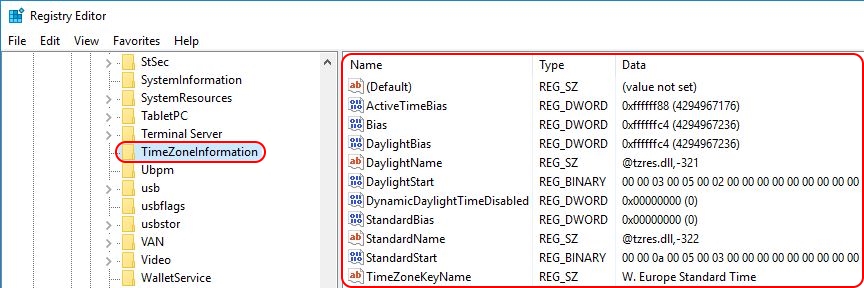
To find out the exact value for each of the ten registry entries, first set the time zone manually in the local Date & Time configuration. Afterwards, simply check the aforementioned registry values.
| Note: all available time zones are also listed in the registry in the key HKLM\SOFTWARE\Microsoft\Windows NT\CurrentVersion\Time Zones. |
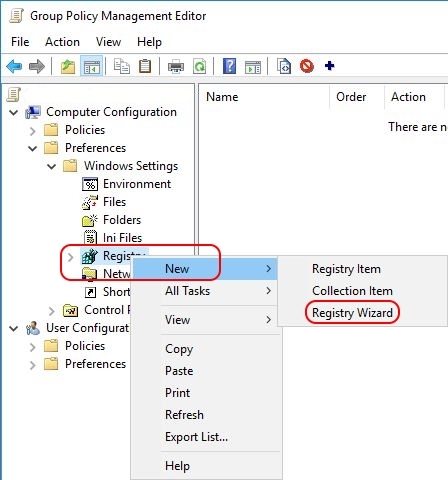
Open your Group Policy Management Console (GPMC.msc) and navigate to Computer Configuration \ Preferences \ Windows Settings \ Registry. Since we need to import multiple values, I suggest to use the registry wizard. With a right-mouse click on Registry select New \ Registry Wizard.Now that we have all the information we need, we can set the correct time zone for the local machine. The easiest way to accomplish this is by using a Group Policy Preference registry item. And no, unfortunately there is no native out-of-the-box group policy setting or preference to configure the time zone. This goes for all Windows operating systems.
On the first page of the wizard, make sure that Local Computer is selected and click Next. On the second tab, the Registry Browser, navigate to the registry key HKLM\SYSTEM\CurrentControlSet\Control\TimeZoneInformation. Tick the box of each individual registry value (as shown in the image below). Use the scroll bar on the right to go down in the list. Unfortunately, there is no Select All option (@Microsoft: HINT!).

Click Finish. The registry values have been imported.
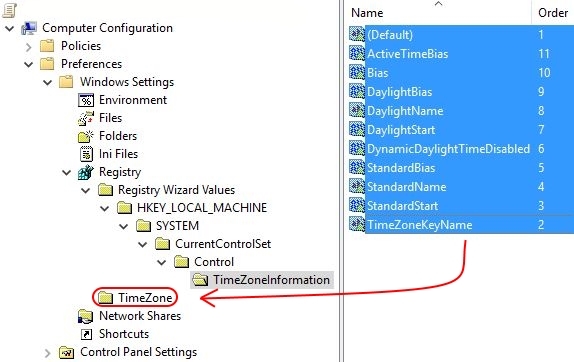
If you are unhappy with the organisation of the registry items, you can easily move the individual settings (in the blue box) to a new collection item.

First, we need to create a new collection item (this is basically a folder). With a right-mouse click on Registry select New \ Collection Item. Enter a name for the collection item, for example TimeZone. Now you can move all individual registry items to this new collection item per drag-and-drop.
Afterwards, you can delete the collection item named Registry Wizard Values (all underlying folders are automatically deleted as well).
The registry item is now created and will be deployed to all machines to which the particular Group Policy applies.

| Note: by default, the value name is used as the name of the registry item (as is visible in the image above). It is possible to rename the registry item afterwards, but please be aware that whenever you make changes to the registry item, it’s name will revert back to the value name. |
After configuring the time zone, restart the machine to allow the changes to take effect.
| Supported operating systems: Windows 7 / Windows Server 2008 R2 and higher, up to and including Windows 10 and Windows Server 2016 (all versions and builds), with PowerShell 5.1 installed (this is a requirement!). |
For those of you who want to include the configuration of the time zone in a PowerShell script, the cmdlet Set-TimeZone can be used. The basic command is as follows: